Showing posts with label Tutorials. Show all posts

Sunday, April 22, 2012

Realistic Doll Eyes tutorial #2

Hello out there in blog land! I've finally put together another method for making realistic "glass like" eyes for your dolls and clay sculptures. I'm sure I missed covering some of the things from the first tutorial, so be sure to refer that post for more details http://mistymooncreations.blogspot.com/2010/10/glass-eyes-for-your-dolls-tutorial.html

I am just tickled that the first eye tutorial is THE most visited post on my blog! I've loved seeing the eyes you've made using it, so many talented artists around the world. *Waving at all my visitors from the BJD and Pullips forums* I've read quite a few mentions "but it's in English"..don't forget to use the translator on my blog ;)


I'll try to keep this one shorter, it's mainly just some updates in technique to make my life easier and I hope it will give you another option and new ideas. Some of the biggest changes were:
- Instead of Liquid Fimo Gel I now use Gel Du Soleil UV Resin (credit: Thanks to Marina's Eye Tutorial , more ideas here!)
- I found plastic/Saran wrap to be MUCH easier and faster to work with than the baby powder or corn starch to keep tools from sticking.

I LOVE the Gel Du Soleil UV Resin, it is a one part resin, so no mixing two parts together (creating more air bubbles). It can also be baked. I've baked the eyes I made with this method in my clay sculptures multiple times for 30 minutes at 275 degrees Fahrenheit. (I'm not sure about using the heat gun on them, I haven't been brave enough to try it since the temperature can't be regulated) They do not melt, they don't turn yellow, and they don't get cloudy. Simply wipe off any raw clay that has gotten on the resin while sculpting with a dry cloth or brush before baking. One warning: Do NOT use Sculpey Smoothing oil on the cured resin, it WILL make them dull and cloudy. This is the only resin that I know of that can be baked at the temperatures required for curing the clay. I've heard of people using the clear resin that is used on fake finger nails. Even the best nail resin can yellow, that is why people who use tanning beds apply a UV protection polish. That's all I'll say about that ;) I put my Gel du Soleil eyes outside for a week and no yellowing. If you are making them for BJDs or Air Dry clay dolls that don't need to be baked, I'm sure there are other resin options out there if you can't find Gel Du Soleil. I buy mine here http://www.artbeads.com/glaze002.html . It is the cheapest I've found if you buy 3 or more bottles. They also sell a large bottle, but honestly I'm still on my first tiny bottle after making a TON of eyes and experiments. Oh..and use in a well ventilated area..this stuff smells!  Ok so here we go!

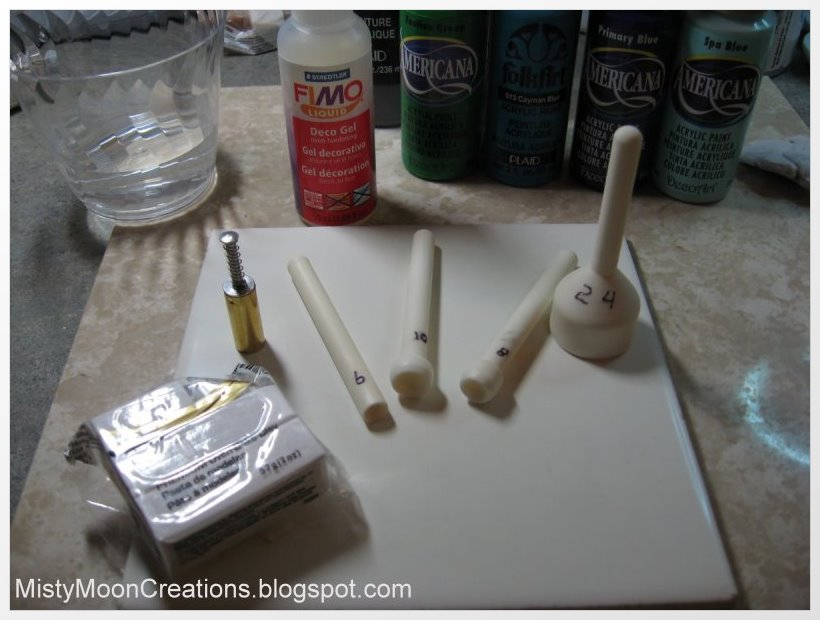
I use a clay extruder to make noodles. The size of the noodle will be the size of the iris. 

Measure the hole in your extruder disk. This one is 3mm so it will be used to make a 6mm eye. I use half the total measurement. IE: 4mm Iris for 8mm total eye width, 5mm Iris for 10mm eye etc.


If you don't have a clay extruder, you can use a flat piece of glass or plastic. Put stacks of playing cards or  tiles etc, anything you have that is the thickness you want the noodle to be, at each end of the flat surface. Place the clay in the center and roll it out, keeping the glass, plastic etc. parallel to the work surface. You want the noodle to be an even thickness.


Now I bake the clay noodles. I place them in an oven safe dish with a layer of Polyfil, covered with a piece of thin cloth. This prevents any flat spots. Once they have baked, (for the type of clay I'm using I baked 15 mins at 275 degrees F) I lower the temp to 200 to keep them hot. In the next step we will be slicing the noodles, and they are much easier to slice when they are hot. You will be able to tell when they cool down too much, they lose their "rubbery" feel and your blade snaps down harder, making ruff edges on the slices. 


Here is my slicing blade, nothing fancy, just a pack of blades from the hardware store. I put tape on the dull side so I know which side to grab when I pick it up ;)


Now start slicing thin dots from the noodles. I can get about half way through cutting a noodle this size before it cools down too much, then I just toss it back into the oven and grab another piece. I find it easier to place one side of the blade on the tile, using it as a pivot point. Also if you look straight down from above it helps to get nice flat slices. You can discard the ends or any spots with air bubbles (you'll hear them when using a clay extruder).


Chop chop chop until you have a bunch of iris confetti :)


This part makes life a whole lot easier. Get some double stick tape (it says permanent but it's not really) and some cards, or..ahem, those little laminate counter top samples from the hardware store :)


Now stick the tape to a card, and the confetti dots in pairs to the tape. Now they're ready to paint, and wont go anywhere! The above photo is from when I made my noodles out of colored clay. This is an easier route if you don't want to paint the actual eye color, just put a dot of black paint in the center for a pupil. I found I like using white, and painting the pupil first. The contrast allows me to see if the pupil is centered and the same size as it's partner. I also prefer to paint on a lighter background and build up layers of detail. Experiment and find which way works best for you. 


Tiny detail artist paint brushes are expensive. I buy "Nail Art Detail Brushes". The one above is a pen style. I have since found some with even shorter bristles. I got several packs cheap on ebay, size "0000" is my favorite for painting small eyes. They seem to last me just as long as the expensive one, maybe even longer. 

Paint: You can use craft acrylics, artist acrylics, watercolors, whatever you prefer. I was so thrilled when I found fine tip Sharpies in a rainbow of colors, but guess what..they're not quite as permanent as they claim to be. They leached into the whites of the eyes badly. Bummer! Guess I'll have to use those on another art project :)


Using a paintbrush, I put a thin layer of Gel du Soleil on the irises. This seals the paint. Do be careful with green paint, and let them sit a day or two before using them in a sculpt to make sure there is no leaching. That is why this step is important. Since green is made up of blue and yellow, sometimes they separate and I've found the yellow leaching into the whites if I didn't pay extra attention in this sealing step, or I painted over the edge and didn't seal the edges. I put a couple drops of Gel du Soleil on a glazed tile and use the paintbrush to apply. Clean your brush with alcohol when done. Since it is a UV curing resin, I clean the brush immediately so my "realistic light" bulbs or Ott lights don't cure the resin. This would take hours..but better safe than sorry. 


I cure the resin in a 9w nail light for 15 minutes. You can find these pretty cheap on ebay too. The resin will cure in direct sunlight also. See how nicely the card fits into the light? :)


While the resin is curing I start making up the whites. I'm using Pat Moulton's Eye Tools, I love them! You could also make a mold by pressing a marble or bead half way into the clay in the size you need. Experiment :)


See how nice the plastic wrap works? Just place it between the clay and the tool and voila!


Once my irises have cured, I pluck them off of the tape and center them onto the whites. Then I place the plastic wrap over the top, and press down with the tool again. 


Check from the sides to make sure the iris is level, and clean up the extra clay around the edges. I use a toothpick. If you have any wrinkles in the whites from the plastic, smooth them out with a soft dry paint brush, a gentle "petting" motion works well. You can use a TINY bit of smoothing oil, just be sure to keep it on the whites and not the irises with the resin. Now bake according to your clay's instructions.

If you baked on something that wont fit into your UV light (like I did!) you can pop them off the tile and place them back onto the taped card (or smaller tile, whatever you have) You can see my little laminate sample in the background :D Now we're going to add more resin to form the dome. 

Side view. I choose to only do the iris and not the entire eye. First, the resin acts like oil on water and tries to bead up or run off the sides, I kept patching the "bald spots". I tried it over Liquid Sculpey, I tried cleaning with alcohol first, no luck. So I finally decided I like this way better anyway. This allows you paint details on your finished sculpt, like shadows, veining, tear ducts, etc that would likely not want to stick if the whites were covered in resin.  You can also gloss the whites after baking with a glaze, but in every photo of sculptures I've seen, the reflection is only showing on the iris, even on all glass eyes.


If you end up doing a few different sizes, save your sanity and organize the irises *grin* This is from the colored noodles. I now have containers of all white in different sizes. This way I can easily see the sizes I have without worrying about having each color in each size. Have fun making realistic glass like eyes for your dolls and sculptures!

Happy Creating!
~Aimee


Friday, October 29, 2010

"Glass" Eyes for your dolls- Tutorial

Hello my pretties! Come on in and sit a spell. I've got something fresh out of the oven and hmm, well..you might not want to eat them, especially when they LOOK at you that way. *Cackle* Oh my another wave of Halloween spirit swept over me for a minute there! I'm afraid the wonderful smells are merely from the Pumpkin Pie Spice tarts melting in the warmer heheee! SO! If the last tutorial was a mini-tut, this might be a mega-tut. I DO feel like sounding the trumpets for finally getting it done, but that might be mega-tuting my own horn? Ha! Ok ok... I've gotten the eye tutorial finished. I'm so grateful  for all the information artists share that have helped me along on my artistic journey. I've always sworn once I figured out how to do something cool I would share it, and I think these have turned out pretty cool! I've attempted to do this tut for awhile now, but I end up getting so involved in the creating that I forget to keep taking pictures along the way! This is my way of doing them, with a few variations stuck in here and there. I even had a few "Aha!" moments getting new ideas as I was taking pictures. So I don't know if this is the right way, wrong way or crazy way...just my way :)

~~ Supplies can vary because much of this can be stuff around the craft room, bits and bobbles you never thought of as tools.

~~ You will need some clay: This can be whatever brand you like (Premo, Sculpey, Fimo, etc). Experiment with the color of the whites of the eyes. Straight white can work, depending on the look you are going for. Sometimes I might mix a tiny tiny pinch of blue, or flesh color to make them more realistic. But my mixture is 2:1 transparent to white. That means I use half as much white as transparent clay. Try different ratios to see what color works for you. Mix them very well until you can't see any streaks. A pasta machine is very helpful with this :)

~~ I also use a glazed ceramic tile to sculpt on, as well as baking the eyes. I picked up a 6x6 inch tile at Lowes. (Today I picked up another in black so I can see the shape of the eye better in contrast to the tile).

~~ You will need Liquid Fimo and a Heat/Embossing gun.  I've tried other brands of Liquid Clay and found that they didn't get as clear as the Liquid Fimo, they were also much thinner and hard to get a nice "domed" cornea shape that magnifies nicely.

~~ Paints of your choice (acrylic, Genesis Heat set paints).
~~ Baby Powder/Talc or corn starch to keep your tools from sticking to the clay.

Ok..if you really want to spoil yourself and make things uber easy, I absolutely LOVE Pat Moulton's Perfect Eye Tools. They come in lots of sizes, from life size eyes down to tiny 2mm. You can see them in the pic below. You can buy them on her website under Tools http://www.patmoultonsbabycollection.com (I am not affiliated with the website in any way, I just think these tools are FAB!)


I also use these ball stylus tools. I got mine from a Nail Supply Shop, I think they call them "dotting tools". There are lots of tools and cool stuff you can find at Nail/Beauty Supply shops much cheaper than from an Art Supply! Especially teeny tiny detail paint brushes!


I was also experimenting with another style/shape of eye using the Kemper circle cutters. You could also use a cap, lid, etc to cut out circle shapes. Trying to think of alternatives for you if you don't have the "uber cool tool" lol. Of course, you can also roll little balls of clay, place them in your freezer for a few minutes, then cut them in half. If they are cold before you cut them they wont get smooshed so easy. Ok, first I rolled out some clay on the thickest setting on my pasta machine. Dip your circle maker of choice into your powder, tap off excess, press into clay like so:


When I move on to using the Perfect Eye Tool, I fold the clay in half so it will be thick enough to fill the dome of the tool (For this tut I'm making 6mm eyes). Again, with any tool, I dip in powder, tap off excess, press into clay, repeat. I might seem tedious to keep doing it every single time, sometimes I can get away with ever other time. But usually it just ends up getting stuck in the tool and I have to pick it out and start again. Press down until you feel the tool against the tile, give it a little spin and lift off.


Let's do a few shall we?


You might notice there is extra clay around the eyes, where it has been smooshed out by the tool. I take a small stylus or tooth pick and clean up the edges. This doesn't have to be perfect at this point, we will do it one more time in a bit, then we can get nit-picky ;)


And here they are all cleaned up:


At this point your clay should be sticking nicely to your tile, this is a good thing! We wont be moving/removing them from the tile until we are completely done. Unless you are feeling adventurous and like chasing little eyeballs all over the place when you use your heat gun ;)

Now I use a stylus, and make a shallow, gentle dent. By gentle, I mean just use the weight of your hand holding the tool, don't press. At this point the clay has been compressed, and too much pressure too fast will cause little cracks around the edge of the iris. These will then suck the paint right into them, bad thing. This first dent determines the depth, now we're going widen it a bit. Place your stylus in the dent and start to wiggle it a bit, building up to a tiny circles until it is as big as you want it. You can see the progression of the iris size in the three I've done below, the top being the largest.


Ok, now the next step is important if you need to be precise with the size. I started with a size of 6mm. but I've displaced some of the clay, thus making them too wide. I could probably start with a 4mm, then widen up to a 6mm....another test for another time! So for now I'll use the Perfect Eye Tool once again to bring them back to the right size. More clay will squish out the sides.


Time to clean up the edges for the final time. This is where the black tile will come in handy so I can see if I missed anything (obsess much? why yes, yes I do haha). Cause these really are no fun to try to sand at this size :) You might also want to turn on your oven and let it start preheating.

Now give them a good look over. If your iris have shrunk from the last step, gently widen them again, it will only take but a nudge. Also make sure that you have matched pairs (iris are roughly the same size as the one next to it). 


Time to bake! Read the instructions on the brand of clay you are using for temperature and time. I bake mine at 275 F for about 12 minutes. An oven thermometer is a big help as well. I have a convection oven that I use just for baking clay, and I find the temps get about 5-10 degrees hotter when I'm not using the fan option, so pay close attention and adjust your temperature accordingly. 


I've experimented quite a bit with different tools, shapes and paints.  Don't feel bad if you find yourself surrounded by eyes....it's quite addicting hehe. On the blue one on my finger below I used the clay itself to create the dome, then glossed it with Liquid Fimo. It looses it's glass 3D effect this way, but I just wanted to show you some other options. I created the groove for the darker contrast color and the dome at the same time using tubes. You could also use straws, caps, lids, even those little tube sleeves that come on your new paint brushes. This is how it looks:


For final dolls sculpts I prefer to use Genesis Heat Set Paints for things like blushing, shading, lips etc. But for the eyes I found acrylics to be MUCH easier to use. I tried mixing both types of paints with the Liquid Fimo to build the color that way, but it was quite fussy and not as clear as I would have liked. If I used the tinted LF, I had to decide when to add the black dot for the iris. Under, it wasn't clear enough. Over, and it looked like it was floating, sometimes even casting a shadow. If you look at your own eyes (and randomly start starring at peoples' eyes ha, yep...guilty!) you'll see the color of the iris doesn't cover the black pupil. I had trouble getting the genesis paints thin enough to work with. The Genesis Thinner is the consistency of Vaseline, and the instructions say not to us more than 40% or they might not set correctly. I also tried mineral spirits/turpentine to thin the paints. I found with the small amount of color needed, they didn't mix as well as I would like, and evaporates quite quickly. You can see my "experimental pallet" below.


If you want to try Genesis, they can be spendy. But there are samples kits and testers available. The large containers are ones I bought, then emptied the plastic tubes into them for easy use. The smaller containers I bought from a "Reborn Supplier". You can get a lot of different colors in small amounts this way for a decent price.


In the end I found I prefer working with acrylic paints. They flow better, can be easily mixed, and really...I didn't notice any difference in the final product between the acrylic and Genesis. I made a little paint pallet by taping a piece of Freezer Paper to my table. Experiment with colors and have fun! Here I'm showing the Metallics by DecoArt in Bronze. I like the way this looked as an over coat or mix in with the brown, creating an orange sparkle effect. 


I used a tiny paint brush to color the iris, two coats, drying in between. You can either paint your darker color first, then go over again with the lighter/accent color...or if you have steady hands you can paint the lighter color, and paint the darker ring around the edge after it is dry. I find a needle tool, or awl is easier for this. Wipe it off often and reload, when you paint the edge, think of painting eyebrows on a mouse..tiny little strokes :) It's hard to see, but my needle tool has dark blue paint on the tip!


If you make a mistake, wait until after the paint has dried and you can scrape it off with a needle or your finger nail. If you try to wipe it off wet, it tends to smudge and stain the whites of the eyes. I just scrape my nail across the top to get rid of any excess.


Now use a clean dry paintbrush to get rid of any dry paint that has been removed.


While I was taking photos for this tutorial I had three "Aha!" moments. Are you ready? I think they're pretty exciting, maybe I'm easily entertained :) Ok ok...I was asking myself....self...what if the people reading this don't have a ball stylus? Hmmm indeed self, this could be a problem. BUT...what if they have a needle tool/awl and a ....drum roll....BEAD!? Yes a bead! See the nice little dent it makes in my scrap clay? It's cool huh? I thought you would agree. 


Ok that's my "Aha!" #1. Thennnn I thought....wow...what if I turn it the other way and press it into the clay? I would have the pupil dent AND the iris, BAM! "Ahaaaa!" #2. Yeah you totally have to click the pic to see it's full coolness. Ahem...


So for "Ahaaa!" #3, as I'm "eyeing" (harhar) my bead box...I spy with my little eye some seed beads! Now whaaat iiiiiiff...I stick that in the clay. (This experimenting stuff is FUN I tell you!) Voila..you have a iris. Just add a dot of black in the middle. Just don't use plastic beads, they might melt :)


Okay okay where was I...oh yes..we need our pupil! Use a small stylus, or needle, or toothpick etc. I like to drag my little puddle of black paint a little...so I have an even littler puddle, not as deep if you will. It's easier to control the amount of paint you pick up this way. I dip the stylus in the black paint, take a deep breath, exhale, then dot the center of the eye. Wipe off tip of stylus, remember to inhale, and repeat. It's not frustrating, it's Zen...don't forget this :) 


Once your paints are dry, it's time to gloss the whites of the eyes. I used an old (but clean) small paint brush, and poured some of the Liquid Fimo on a clean piece of Freezer Paper. Don't be tempted to fill in the iris, not just yet. Heat set this layer first. You can pop them in the oven for a couple minutes, or use your heat gun. It happens pretty quickly, be careful not to burn them...keep at least 3 inches away. They will start look dull, or frosted/hazy on the whites, then they will get glossy. As soon as this happens take the heat away.  I tried to do the cornea and the eye white gloss at the same time and it tends to run...something about surface tension here. Doing it this way makes the pupil dome stay put better. Notice I have another (12x12 marble) tile under my ceramic tile so my counter top doesn't get hot- Warning: the smaller tile will be HOT, even after only a couple minutes. I wipe the excess liquid clay from the paintbrush then clean with rubbing alcohol.


Now we're going to fill the iris. Using a toothpick or preferred tool, drop some Liquid Fimo into the iris. Look at them from the side to make sure they are fairly similar in the height of the dome. (Move your head, not the tile, or you'll be crying over spilled cornea *giggle*)


Now...let them sit a minute (no fans, cats, kids etc). Let the eyes a rest for a few, yes yours too! Let the oven heat up (turn off the convection/fan option!) and grab a cup of tea. Psst...we're giving all those pesky potential bubbles a minute to show themselves. Sometimes they do if they don't think we're watching them! Bet you didn't know that about bubbles did you, they are quite sneaky!

Now, when you come back you might notice a few bubbles. Use a toothpick to gently pop them. Turn the toothpick around and use the other end to pop the next one. A dry toothpick works better, again....something about surface tension. Now carefully place the tile in the oven and bake them for 5 minutes. If your oven is far away from where you are making your eyes, you might want to plan ahead for this step so you don't have to carry them as far, and fill them near the oven :)

Once the tile is cool enough to pick up, bring it back to your work station. They will be slightly foggy at this point. Now here's where the magic happens. Turn on your heat gun, let it warm up a few seconds, then hold it over each eye for 5 seconds or less. Presto! Nice and glossy!


Despite my best efforts, sometimes those pesky bubbles are more clever than I. Eye? So it's a good idea to make a few of the same color just in case a couple don't pass inspection :) 


Wait until they are no longer hot, but still warm to remove them from the tile. They will pop right off. Now they are ready to use! When you go to use them in a sculpt and you've been working with raw clay, wash your hands before you place them in the head. The clay on your hands will stick to the eye and make it look hazy. This might happen anyway, just make sure you wipe them off before you bake the head/sculpt. When you are all finished with the baking process you can put a thin coat of Sculpey Glaze/Gloss (or your favorite gloss product) and they will sparkle again.
*EDIT: I discovered after using Sculpey Gloss coating on a finished practice head that it looks great, but because such a thin coat is needed, if any pressure or contact made to the eyes might crack it ( like me poking it with my finger nail). This is because there is a little flexibility in the Liquid Fimo after it is curred. So I wouldn't recommend this if you are selling/shipping your creation. I did try putting another thin layer of Liquid Fimo to fix it, but I would heat set this for a minute in the oven. I *really* was being careful with the Heat Gun, and still ended up burning an eyebrow (the sculpts, not mine heh). 


Whewww it feels good to get all of that out of my head and into a blog finally! I hope it all makes sense!  Now...I have this recipe that requires eye of newt, I wonder what color those would be? *Laugh*

See those little symbols right under this post? (I haven't figured out how to make them bigger, brighter or more eye catching...yet) Feel free to share this post! If you make some eyes feel free to leave a link in the comments I'd love to see them! Happy creating :)

~*Aimee*~

Related Posts Plugin for WordPress, Blogger...